No edit summary Tags: Help sourceedit |
(Help page update) Tag: rte-source |
||
| (8 intermediate revisions by 6 users not shown) | |||
| Line 7: | Line 7: | ||
::[[File:Edit_toolbar_image_upload2.png|thumb|left|600px]] |
::[[File:Edit_toolbar_image_upload2.png|thumb|left|600px]] |
||
<br style="clear:both" /> |
<br style="clear:both" /> |
||
| − | *A pop-up will appear, which will allow you to upload a photo from your computer. You can also search for photos already added to the |
+ | *A pop-up will appear, which will allow you to upload a photo from your computer. You can also search for photos already added to the community by others or on [http://flickr.com Flickr.com]. |
::[[File:Addimages-alreadyuploaded2.png|thumb|left|400px]] |
::[[File:Addimages-alreadyuploaded2.png|thumb|left|400px]] |
||
<br style="clear:both" /> |
<br style="clear:both" /> |
||
| Line 21: | Line 21: | ||
*Once you are done, click publish and your photo will be live on the page. |
*Once you are done, click publish and your photo will be live on the page. |
||
| − | == Recent Photos == |
||
| − | This feature was removed from the right rail (sidebar) on in March 2015. See [[w:User_blog:Rappy_4187/Technical_Update:_March_10,_2015|Technical Update: March 10, 2015]]. |
||
| + | [[File:Wikia University - Adding an Image|thumb|center|600 px|Video tutorial on how to add images.]] |
||
== Next steps == |
== Next steps == |
||
*Learn how to [[Help:Formatting|format a page]] |
*Learn how to [[Help:Formatting|format a page]] |
||
| + | *Learn how to [[Help:Videos|add a video]] |
||
*Learn how to [[Help:Links|add links]] |
*Learn how to [[Help:Links|add links]] |
||
*Learn how to [[Help:New_page|create a new page]] |
*Learn how to [[Help:New_page|create a new page]] |
||
| Line 33: | Line 33: | ||
{{Help and feedback section}} |
{{Help and feedback section}} |
||
| ⚫ | |||
| ⚫ | |||
| ⚫ | |||
| + | |||
| + | [[ar:مساعدة:صور]] |
||
[[ca:Ajuda:Imatges]] |
[[ca:Ajuda:Imatges]] |
||
[[de:Hilfe:Bilder/RTE]] |
[[de:Hilfe:Bilder/RTE]] |
||
[[es:Ayuda:Imágenes]] |
[[es:Ayuda:Imágenes]] |
||
| + | [[fi:Ohje:Kuvat]] |
||
[[fr:Aide:Images]] |
[[fr:Aide:Images]] |
||
[[it:Aiuto:Immagini]] |
[[it:Aiuto:Immagini]] |
||
| Line 42: | Line 48: | ||
[[nl:Help:Afbeeldingen]] |
[[nl:Help:Afbeeldingen]] |
||
[[pl:Pomoc:Obrazy]] |
[[pl:Pomoc:Obrazy]] |
||
| ⚫ | |||
[[ru:Справка:Изображения]] |
[[ru:Справка:Изображения]] |
||
[[vi:Trợ giúp:Hình ảnh]] |
[[vi:Trợ giúp:Hình ảnh]] |
||
[[zh:Help:圖像]] |
[[zh:Help:圖像]] |
||
| ⚫ | |||
| − | |||
| ⚫ | |||
| ⚫ | |||
| ⚫ | |||
Revision as of 23:23, 29 April 2016
Template:Needs editor update Adding photos is a simple and great way to improve any article, and provide further detail and color.
Step-by-Step
- To start, you must log in to your account, and then click the Edit button on the page you would like to add a photo to.
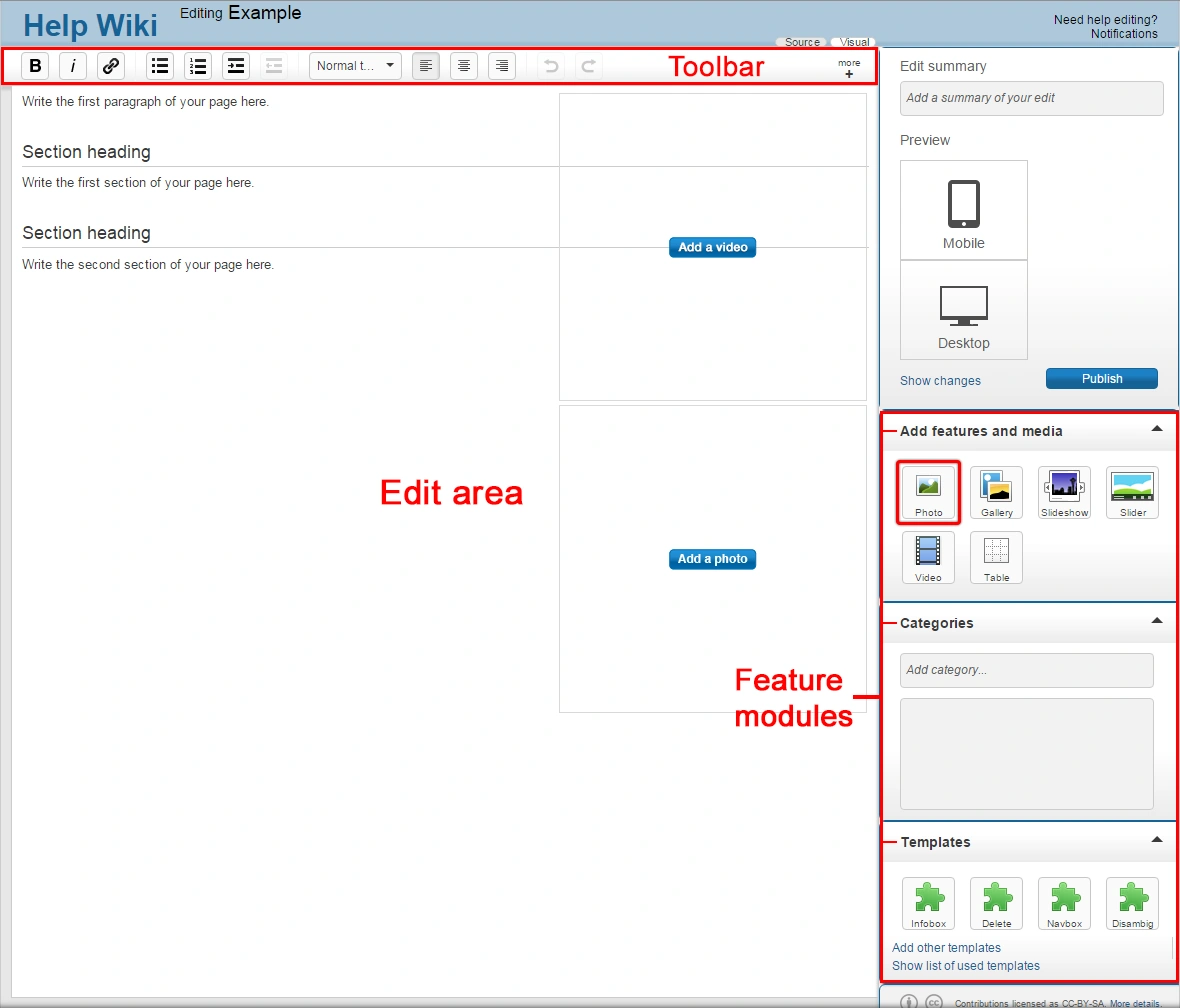
- Once in edit mode, click on the photo upload button
 on the right rail of the editor toolbar.
- A pop-up will appear, which will allow you to upload a photo from your computer. You can also search for photos already added to the community by others or on Flickr.com.
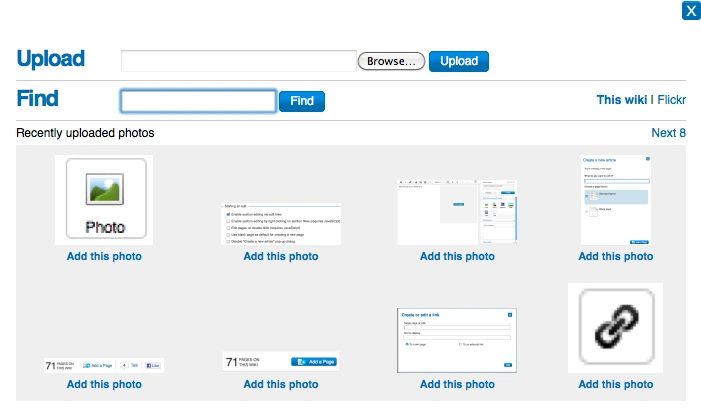
- Once you choose a photo to add, click upload.
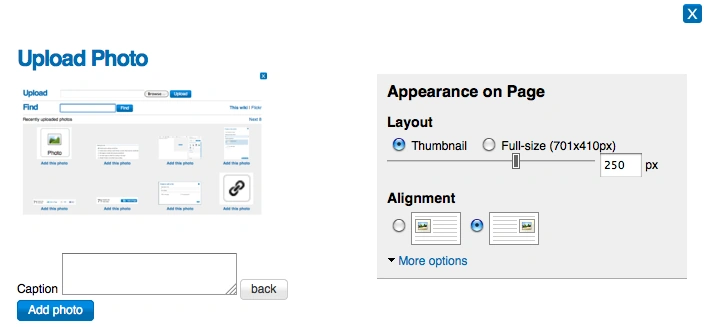
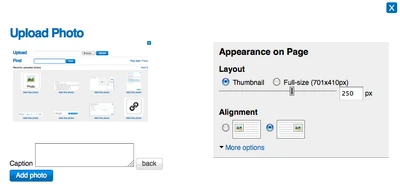
- Next you will be able to adjust the size and placement of the photo. You can also provide a caption, which will display below the photo.
- If you would like to provide more details about the photo, including giving it a new name and providing license information, click on the more options link.
- After you have picked your options, click the Add photo button, and your photo will be added to the edit area.
- Photos can be modified at any time in edit mode. Simply hover over the image and choose "modify", and the same pop-up window will appear.
- Once you are done, click publish and your photo will be live on the page.
Video tutorial on how to add images.
Next steps
- Learn how to format a page
- Learn how to add a video
- Learn how to add links
- Learn how to create a new page
- More information is on Help:Uploading files
Further help and feedback
- Browse and search other help pages at Help:Contents
- Check Fandom Community Central for sources of further help and support
- Check Contacting Fandom for how to report any errors or unclear steps in this article